The GnuPG Smartcard HOWTO
Copyright © 2005 Free Software Foundation Europe e.V.
June 29, 2006
Table of Contents
Table of Contents
With GnuPG everybody has the chance to secure his communication.
To work with GnuPG on different machines (private PC, at work, with laptop etc.) the secret key has to be present on every machine. Distributing the secret key to a lot of different machines does not support its secrecy. Especially at work where other peple have root access on your machine it is not save to store your secret key. Starting with version 1.3.3 GnuPG supports smart cards to save your keys.
This Howto describes how to use GnuPG with a smart card distributed to fellows of the Free Software Foundation Europe.
In general cards that implement the OpenPGP card specification in version 1.0 or higher are supported by GnuPG.
The OpenPGP Card is a smart card (standard size; ISO 7816-4,-8 compatible). Features of this card are:
3 independent 1024 bit RSA keys (signing,encryption,authentication).
Key generation on card or import of existing keys.
Signature counter.
Data object to store an URL to access the full OpenPGP public key.
Data objects for card holder name etc.
Data object for login specific data.
Length of PIN between 6 and 254 characters; not restricted to numbers.
T=1 protocol; compatible with most readers.
Specification freely available and usable without any constraints.
Reasonably priced.
Table of Contents
Since version 1.3.90 GnuPG supports smart cards by default.
Please make sure that libusb is available prior to building GnuPG. It can be obtained from http://prdownloads.sourceforge.net/libusb. On Debian GNU/Linux a simple apt-get install libusb-dev should be sufficient.
If you are not using an USB reader please also install libpcsclite and libpcsclite-dev. On Debian GNU/Linux a simple apt-get install libpcsclite libpcsclite-dev should be sufficient.
If your reader is a native USB device and supports the CCID (Chip Card Interface Description) specification it is directly supported by GnuPG.
Most USB readers today still behave like serial readers. In this case you need the kernel module pl2303 to access the reader. This module is a "USB Serial Driver" which can be found under ->->-> in the 2.6 kernel configuration. This module makes sure that the proprietary reader protocol is translated to a standard protocol.
Without an installation of GnuPG the OpenPGP card will be of little use. So, please, go ahead and install it.
GnuPG can be downloaded from http://www.gnupg.org/download/index.html. Please use the recent stable version.
After downloading and patching the sources GnuPG is installed with the usual ./configure, make, make install. For further information please refer to the installation instructions shipped with GnuPG.
Note
If you are running Debian GNU/Linux you can also build your own Debian package withdh_make and debuild in the source directory. After that you can install it the usual way with dpkg -i gnupg-version.debIf you are using the 1.9 branch of GnuPG and plan to use the PC/SC driver you should now install the software to make sure that the pcsc wrapper binary will be available at the right place.
First you need an OpenPGP compatible smart card which can, for example, be obtained by becoming a fellow of the Free Software Foundation Europe.
Card readers (NOT those used for flash memory cards) can be obtained from computer stores (e.g. https://www.floss-shop.de/en/security-privacy/).
Please note that the USB device class for USB readers is 11 (or 0x0B in hex).

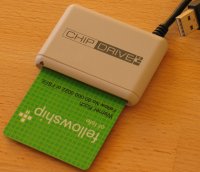
This is a small USB reader (CCID; 65*45*8mm) supported by GnuPG directly as well as by pcsclite. This very device is actually the first reader supported by GnuPG and the reason for the internal CCID driver as no CCID driver was available at that time.

This is a USB (CCID)/serial reader with a numerical keypad and three extra buttons. The pinpad may be used to securely enter the PIN without using the attached computer (since GnuPG 2.0.1). Only USB has been tested.
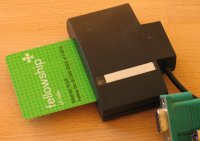
This reader comes in two types: serial and USB. Both readers are very similar and of the same size (65*45*8mm). As far as we know these readers are no longer manufactured have been replaced by the SCR335 from SCM Microsystems.
This USB card reader supports CCID and PC/SC. The older Omnikey Cardman 2020 is no longer produced. The newer reader has not been tested, but Omnikey says that the two readers are compatible.
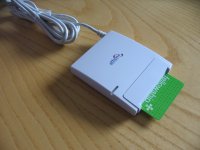
This serial card reader supports PC/SC. The older Omnikey Cardman 2010 (photo) is out of production. The serial version of this reader has not yet been tested.

This USB card reader is supported by PC/SC as well as by GnuPG's internal driver. This is actual a dual reader with a second device to access RFID tokens; this is supported by the forthcoming librfid..
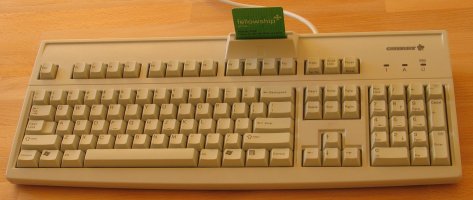
This is an USB keyboard with integrated CCID card reader. It is supported by PC/SC as well as be GnuPG's internal driver. The mueric keyblock may be used to securely enter the PIN without using the attached computer (since GnuPG 2.0.3).
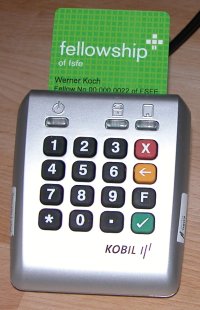
This USB card reader is supported by PC/SC as well as by GnuPG's internal driver. The pinpad may be used to securely enter the PIN without using the attached computer (since GnuPG 2.0.1).
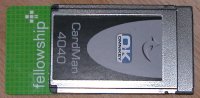
This is a CardBus (PCMICA) reader to be used with Laptops. The SVN version of GnuPG supports this reader trough its internal driver. There is no free PC/SC support. A recent Linux version (2.6.15.3) is required. Very handy and useful devices so you can expect any problems to be solved fast.
This is a compact reader with USB or serial interface. It works fine with PC/SC (pcscd, libasedrive-usb or libasedrive-serial Debian packages).

This is a CCID reader for ID-000 sized cards. It works fine with GnuPG's internal driver and should also work with PC/SC. If you want to cut a full sized card down to ID-000 format, take care to remove all burr and round the edges a bit. This is in particular important so that you are able to remove the card using the tiny blue lever.
Two standard protocols are used by GnuPG to access card readers.
The driver to access CCID cards is built into GnuPG. This driver will be used by default.
To use this driver follow the instructions and make sure you have sufficient permission (see below) to access the USB device for reading and writing.
First of all, you will need to download two files for udev and copy them to the udev configuration directories, in order to let it identify your card reader:
Now, open a terminal and become root (you will be asked for your root password):
archi@foobar:~ > su -
On Ubuntu systems, you should run (and then you will be asked for the user password):
archi@foobar:~ > sudo su -
Then you will have to move the files from the directory you have saved them to, to the udev configuration directories:
# cd /home/directory/where/you/saved/the/file (change for the right path)
# cp gnupg-ccid.rules /etc/udev/gnupg-ccid.rules
# cp gnupg-ccid /etc/udev/scripts/gnupg-ccid
# chmod +x /etc/udev/scripts/gnupg-ccid
# ln -s /etc/udev/gnupg-ccid.rules /etc/udev/rules.d/gnupg-ccid.rules
All the configuration files are in the right place and with the right permissions by now.
You will now create a group scard, give this group permission to access the smart card reader, and include the users who should have access to the card reader to this group.
# addgroup scard
# addgroup yourusername scard (change for the right username)
# exit (to logout the root user)
The described hotplugging mechanism assigns permission for all CCID devices to the users in scard group.
Create the following two files. The first file is a mapping file which decides on the script to run when detecting a CCID device. The second file is the script that should be run if a device with the matching parameters is plugged in. This script is the one to actually assign the permissions.
                        /etc/hotplug/usb/gnupg-ccid.usermap
# The entries below are used to detect CCID devices and run a script
#
# USB_MATCH_VENDOR            0x0001
# USB_MATCH_PRODUCT           0x0002
# USB_MATCH_DEV_LO            0x0004
# USB_MATCH_DEV_HI            0x0008
# USB_MATCH_DEV_CLASS         0x0010
# USB_MATCH_DEV_SUBCLASS      0x0020
# USB_MATCH_DEV_PROTOCOL      0x0040
# USB_MATCH_INT_CLASS         0x0080
# USB_MATCH_INT_SUBCLASS      0x0100
# USB_MATCH_INT_PROTOCOL      0x0200
#
# script   match_flags idVendor idProduct bcdDevice_lo bcdDevice_hi
#          bDeviceClass bDeviceSubClass bDeviceProtocol
#          bInterfaceClass bInterfaceSubClass bInterfaceProtocol driver_info
#
#           flags  V       P     Bcd C S Prot Clas Sub  Prot Info
#
# Generic CCID device
gnupg-ccid  0x0080 0x0    0x0    0x0 0x0 0x0 0x0 0x00 0x0B 0x00 0x00 0x00000000
# SPR532 is CCID but without the proper CCID class
gnupg-ccid  0x0003 0x04e6 0xe003 0x0 0x0 0x0 0x0 0x00 0x0B 0x00 0x00 0x00000000
# SCR33x is CCID but without the proper CCID class
gnupg-ccid  0x0003 0x04e6 0x5115 0x0 0x0 0x0 0x0 0x00 0x0B 0x00 0x00 0x00000000
script states the script that should be run if a device matching the parameters is plugged in via USB.
match_flags is one of the given USB_MATCH_XXX options. The idVendor and the idProduct can be figured out by calling lsusb. The output looks something like this:
archi@foobar:~ > lsusb
Bus 001 Device 009: ID 04e6:5115 SCM Microsystems, Inc.
The values given behind ID are idVendor:idProduct and with a leading 0x could be used in gnupg-ccid.usermap in combination with USB_MATCH_VENDOR or USB_MATCH_PRODUCT.
                        /etc/hotplug/usb/gnupg-ccid
#!/bin/bash
#
# taken from libgphoto2
#
# Sets up newly plugged in card reader so that only members of the
# group can access it

GROUP=scard

# can access it from user space. (Replace scard with the name of the
# group you want to have access to the card reader.)
#
# Note that for this script to work, you'll need all of the following:
# a) a line in the file /etc/hotplug/gnupg-ccid.usermap that corresponds
#    to the card reader you are using.
# b) a group "scard" where all users allowed access to the
#    card reader are listed
# c) a Linux kernel supporting hotplug and usbdevfs
# d) the hotplug package (http://linux-hotplug.sourceforge.net/)
#
# In the usermap file, the first field "usb module" should be named
# "gnupg-ccid" like this script.
#

if [ "${ACTION}" = "add" ] && [ -f "${DEVICE}" ]
then
    chmod o-rwx "${DEVICE}"
    chgrp "${GROUP}" "${DEVICE}"
    chmod g+rw "${DEVICE}"
fi
This script changes the permissions and the ownership of a USB device under /proc/bus/usb to grant acces to this device to users in the specified group. The group in this example is scard. ACTION and DEVICE are passed via the hotplug mechanism.
Note
Do not forget to run chmod +x on the script.
You should also create the group scard and then add the users to access the card reader to the group. This is done by the following commands: addgroup scard and addgroup <user> scard.
Note
Brian Gough <bjg@network-theory.co.uk> made the following remark: The hotplug package in Debian woody requires all the numbers in gnupg-ccid.usermap to have a 0x prefix otherwise it gives an "unparseable line" error and the i.e. gnupg-ccid 0x0003 0x04e6 0xe003 0x0 0x0 0x0 0x0 0x00 0x0B 0x00 0x00 0x00000000 instead of gnupg-ccid 0x0003 0x04e6 0xe003 0 0 0 0 0x00 0x0B 0x00 0x00 0x00000000. After installing the modified file call update-usb.usermap.
Please make sure that you can mount a USB device. This can be achieved by accessing the USB stack via libusb through the usbfs (USB filesystem). If you are using USB < 2.0 the filesystem is called usbdevfs.
To accomplish this goal please add the following line to your /etc/fstab.
                            /etc/fstab
none  /proc/bus/usb  usbfs defaults,user  0 0
To make sure that a specific user has read and write access to the USB device add devuid=[user id] to the defaults, user options. With devgid=[group id] access will be granted to the given group.
This approach creates a major security problem. The owner of the files has full permissions to ALL connected USB devices. It does not matter what kind of device is connected. Therefore it is strongly suggested to use the hotplug method.
TODO
To use PC/SC make sure you disable CCID by passing the --disable-ccid option to GnuPG.
Note
You can easily check your installation by inserting the card in the card reader and entering gpg --card-status (more about this command in Chapter 3, Administrating the Card).
Table of Contents
Warning
Whenever your are asked to enter a PIN make sure you know which PIN is meant. There are two PINs for the card - the PIN and the AdminPIN. Please make sure you do not mix them up.
Note
During the writing of this HowTo it seemed that every once in a while GnuPG did not want to talk with the card reader. We were quite sure we have not changed anything in the configuration but for some reason it just did not work. Werner knows this problem and it will hopefully soon be fixed. Note that we never encountered this problem with Linux kernels 2.4.x - only with most 2.6 kernels.
This phenomenom occurs when the card reader has been in use for quite some time. It might help to re-plug the reader.
The error message displayed looks like this:
gpg: ccid_transceive failed: (0x1000a)
gpg: apdu_send_simple(0) failed: card I/O error
To check if your card (and installation) is working please put your OpenPGP card in the reader and run gpg --card-status. For an empty card the output should look like this:
archi@foobar: > gpg --card-status
Application ID ...: D2760001240101010001000000490000
Version ..........: 1.1
Manufacturer .....: PPC Card Systems
Serial number ....: 00000049
Name of cardholder: [not set]
Language prefs ...: de
Sex ..............: unspecified
URL of public key : [not set]
Login data .......: [not set]
Private DO 1 .....: [not set]
Private DO 2 .....: [not set]
Signature PIN ....: forced
Max. PIN lengths .: 254 254 254
PIN retry counter : 3 3 3
Signature counter : 0
Signature key ....: [not set]
Encryption key....: [not set]
Authentication key: [not set]
General key info..: [none]
The information displayed is the standard output for the Fellowship smartcard we are using. Cards from other manufacturers might produce a different output.
Note
The output depends on manufacturer and specification.
- Application ID
The manufacture's ID. This includes the type of the card, the implemented version of the specification, the manufacturer and the serial number. This is a unique identifier for any card.
- Version
The used OpenPGP specification.
- Manufacturer
The card's manufacturer.
- Serial number
A unique number for all cards from this manufacturer.
- Name of cardholder
The holder of this card. Only plain ASCII characters are Allowed here. gpg does not use this field.
- Language prefs
The card holder's language preferences. gpg ignores this value.
- Sex
Male or female. gpg ignores this value.
- URL of public key
Used by the
fetchcommand ofgpg --edit-card. It may contain an URL to be used to retrieve the public key.- Login data
This field may be used to store the account name of the card holder. It may be used for login purposes. gpg does not enforce any match of this name with a name used in the key. See the source (app-openpgp.c) for some special features of the login-name field.
- Private DO 1
This is a field reserved for arbitrary data.
- Private DO 2
This is a field reserved for arbitrary data.
- Signature PIN
When set to "forced", gpg requests the entry of a PIN for each signature operation. When set to "non forced", gpg may cache the PIN as long as the card has not been removed from the reader.
- Max. PIN lengths
This field is unchangeable. The values are put on the card right after personalisation - this is the moment after the chip has been glued on the card.
- PIN retry counter
This field saves how many tries still are left to enter the right PIN. They are decremented whenever a wrong PIN is entered. They are reset whenever a correct AdminPIN is entered. The first and second PIN are for the standard PIN. gpg makes sure that the two numbers are synchronized. The second PIN is only required due to peculiarities of the ISO-7816 standard; gpg tries to keep this PIN in sync with the first PIN. The third PIN represents the retry counter for the AdminPIN.
- Signature counter
This number keeps track of the signatures performed with the stored key. It is only reset if a new signature key is created on or imported to the card.
- Signature key
This key is commonly used as the primary OpenPGP key.
- Encryption key
This key is commonly used as an encryption subkey.
- Authentication key
This key is not used by gpg at all. Other tools like PAM modules or ssh use this key for authentication services.
- General key info
This primary user ID is shown if the corresponding public OpenPGP key is available.
A new card has the following default PINs stored. The AdminPIN's value is 12345678. The normal PIN is 123456. Please note that the second PIN is two digits shorter.
You might have received a card with a few data fields already personalized (e.g. the FSFE Fellowship card). Please check the documentation which comes with this card to see whether the default PINs are really to be used or from where to get the actual PINs. Often the AdminPIN is send by separate mail.
If a wrong PIN has been entered three times in a row the card will be blocked. It can be unblocked with the AdminPIN.
Warning
It is also important to know that entering a wrong AdminPIN three times in a row destroys(!) the card. There is no way to unblock the card when a wrong AdminPIN has been entered three times.
To access the PIN operations enter gpg --change-pin. Different options for PIN management will be displayed. To select a command enter the number displayed in front of the command.
You are first asked to enter the current PIN. Afterwards you are asked to enter the new PIN. Then you are asked to re-enter the new PIN. The cursor will not move forward to indicate your typing.
The PIN has been successfully changed. The AdminPIN is not affected by these changes.
Use this command to unblock a blocked PIN.
First you are asked for the AdminPIN and then to enter and re-enter a new PIN. The AdminPIN is not affected by this procedure.
Please note that an AdminPIN cannot be unblocked.
Changing the AdminPIN is the same procedure as changing the PIN. Enter the current AdminPIN. Then enter a new AdminPIN and re-enter it. The normal PIN is not affected by these changes.
PINs can also be managed via --card-edit commands.
To follow the instructions in this chapter make sure that the card reader works and the card can be accessed (Chapter 3, Administrating the Card, command gpg --card-status).
To initialise a card enter gpg --card-edit. Basic information about the card is shown. The output is the same as gpg --card-status. The difference is that the output is now followed by a command prompt.
To get a list of all commands available enter help.
Command> help
quit       quit this menu
admin      show admin commands
help       show this help
list       list all available data
fetch      fetch the key specified in the card URL
passwd     menu to change or unblock the PIN
These commands are not very useful because data stored on the card cannot be changed.
For a list of useful commands enter admin and then help.
Command> admin
Admin commands are allowed
Command> help
quit       quit this menu
admin      show admin commands
help       show this help
list       list all available data
name       change card holder's name
url        change URL to retrieve key
fetch      fetch the key specified in the card URL
login      change the login name
lang       change the language preferences
sex        change card holder's sex
cafpr      change a CA fingerprint
forcesig   toggle the signature force PIN flag
generate   generate new keys
passwd     menu to change or unblock the PIN
Save the name of the card owner on the card. Technically this is not required but it will prove useful if more than one card is around.
Enter name and follow the prompts. You are seperately asked for sur- and given name. After entering the data you are asked for the AdminPIN.
Note
The name is stored in an ISO format. This format distinguishes between the different name parts and is also used for machine readable passports.
In general the AdminPin is cached through a session. So if you do not remove the card you will not be asked again to enter it. As always there are exceptions to this rule.
If you like you can also enter the language you prefer (lang) and the sex (sex). gpg does not use this information so you might want to omit it.
To generate a key on the card enter generate. You will be asked if you would like to make an off-card copy of the encryption key. It is useful to say yes here.
Note
Without a backup you will not be able to access any data you encrypted with the card if it gets lost or damaged.
Command> generate
Make off-card backup of encryption key? (Y/n)
If a key exists on the card a security question has to be answered to avoid accidental overwriting.
gpg: NOTE: keys are already stored on the card!
Replace existing keys? (y/N)
The whole process of key generation looks like this.
Note
You might be asked for the PINs at different times.
Command> generate
Make off-card backup of encryption key? (Y/n) Y
gpg: 3 Admin PIN attempts remaining before card is permanently locked
Admin PIN
PIN
Please specify how long the key should be valid.
         0 = key does not expire
         <n>  = key expires in n days
         <n>w = key expires in n weeks
         <n>m = key expires in n months
         <n>y = key expires in n years
Key is valid for? (0) 0
Key does not expire at all
Is this correct? (y/N) y

You need a user ID to identify your key; the software constructs the user ID
from the Real Name, Comment and Email Address in this form:
"Heinrich Heine (Der Dichter) <heinrichh@duesseldorf.de>"

Real name: Archibald Goodwin
Email address: archi@foobar.example
Comment: tester
You selected this USER-ID:
    "Archibald Goodwin (tester) <archi@foobar.example>"

Change (N)ame, (C)omment, (E)mail or (O)kay/(Q)uit? O
gpg: generating new key
gpg: please wait while key is being generated ...
gpg: key generation completed (45 seconds)
gpg: signatures created so far: 0
gpg: signatures created so far: 0
You need a Passphrase to protect your secret key.

+++++
..+++++
gpg: NOTE: backup of card key saved to `/home/archi/.gnupg/sk_26D728A8F09033F1.gpg'
gpg: signatures created so far: 2
gpg: signatures created so far: 2
gpg: generating new key
gpg: please wait while key is being generated ...
gpg: key generation completed (25 seconds)
gpg: signatures created so far: 4
gpg: signatures created so far: 4
gpg: key FF19F200 marked as ultimately trusted
public and secret key created and signed.
gpg: checking the trustdb
gpg: 3 marginal(s) needed, 1 complete(s) needed, classic trust model
gpg: depth: 0  valid:   1  signed:   0  trust: 0-, 0q, 0n, 0m, 0f, 1u
pub   1024R/FF19F200 2005-03-05
Key fingerprint = 884B 9142 F645 1A72 4B92  EB94 DF80 CCEF FF19 F200
uid                  Archibald Goodwin (The Tester) <archi@foobar.example>
sub   1024R/F09033F1 2005-03-05
sub   1024R/3239D981 2005-03-05
Six signing operations are done during the creation of the public and secret key (one self-signature to bind the name to the key and two key-binding signatures for each key). Future versions of gpg might just need three signing operations.
Command> list

Application ID ...: D2760001240101010001000000490000
Version ..........: 1.1
Manufacturer .....: PPC Card Systems
Serial number ....: 00000049
Name of cardholder: Archibald Goodwin
Language prefs ...: de
Sex ..............: unspecified
URL of public key : [not set]
Login data .......: [not set]
Signature PIN ....: not forced
Max. PIN lengths .: 254 254 254
PIN retry counter : 3 3 3
Signature counter : 6
Signature key ....: 884B 9142 F645 1A72 4B92  EB94 DF80 CCEF FF19 F200
      created ....: Sat Mar  5 19:56:42 2005 CET
Encryption key....: 31C1 2190 FCF1 A684 5AF9  D719 26D7 28A8 F090 33F1
      created ....: Sat Mar  5 19:56:43 2005 CET
Authentication key: 811F C45F 911A C15A F6DC  5BD6 58BA B8D1 3239 D981
      created ....: Sat Mar  5 19:57:19 2005 CET
General key info..:
pub  1024R/FF19F200 2005-03-05 Archibald Goodwin (The Tester) <archi@foobar.example>
The card is now ready for use.
Note
Please save the backup key, transfer it to a different medium and store it in a safe place.
It is important that you delete the copy of the key from the hard disk, too. The best choices here are tools like shred from the GNU coreutils package or wipe to make sure that the original content gets overwritten.
A key can also be stored as a printout. Normally you do not need it, but in case your card breaks and the backup copy is not available you still have the chance to re-enter the key. gpg --enarmor may be used to convert the backup key into a printable format.
Table of Contents
Now you should be able to do all the stuff with your smartcard, which you have previously done with your usual GnuPG setup.
You can sign, de- and encrypt files the usual way. The only difference is, that if you are asked for your passphrase you have to enter the PIN of the smartcard.
Table of Contents
Warning
Please make sure to make a backup of you key before experimenting with any of the following commands.
Theoretically you can move any existing key to the card. It does not make a difference if you want to import a primary key or a subkey. Practically there are some restrictions. First, the card does not support DSA keys. Second, only 1024 bit RSA keys are currently supported by the card.
Use the keytocard command to move the key. gpg will do the checking for you and will also tell you if it is possible to move the key or not.
archi@foobar:~ > gpg --edit-key 4A1D3D53
gpg (GnuPG) 1.4.0; Copyright (C) 2004 Free Software Foundation, Inc.
This program comes with ABSOLUTELY NO WARRANTY.
This is free software, and you are welcome to redistribute it
under certain conditions. See the file COPYING for details.

Secret key is available.

pub  1024R/4A1D3D53  created: 2005-03-05  expires: never       usage: CS
                     trust: ultimate      validity: ultimate
[ultimate] (1). Archibald Goodwin (2) (The Tester) <archi@foobar.example>

Command> toggle

sec  1024R/4A1D3D53  created: 2005-03-05  expires: never
(1)  Archibald Goodwin (2) (The Tester) <archi@foobar.example>

Command> keytocard
Really move the primary key? (y/N) y
Signature key ....: 5140 AA49 39A0 01D1 29A9  9042 28D4 524A 2AB4 B711
Encryption key....: E684 AB4A AD27 DEC3 986E  C90F 2AEB 898F F651 8D6B
Authentication key: AF53 357B 5E13 9D2A 4E14  AEB7 07A6 51FA 53CD 8E68

Please select where to store the key:
   (1) Signature key
   (3) Authentication key
Your selection? 3

gpg: WARNING: such a key has already been stored on the card!

Replace existing key? (y/N) y

You need a passphrase to unlock the secret key for
user: "Archibald Goodwin (2) (The Tester) <archi@foobar.example>"
1024-bit RSA key, ID 4A1D3D53, created 2005-03-05

gpg: 3 Admin PIN attempts remaining before card is permanently locked

Admin PIN

sec  1024R/4A1D3D53  created: 2005-03-05  expires: never
                     card-no: 0001 00000049 // Indicating the key has been moved to the card.
(1)  Archibald Goodwin (2) (The Tester) <archi@foobar.example>
Using the card this way is suggested if you already have a key with a lot of key signatures.
Subkeys are keys to use in every day life. They are bound to your private key and are used for signing and decrypting. They normally have a set expiration date. Even overlapping subkeys for a single private key are possible. However, there is one limitation to a full featured private key - subkeys cannot be used for key signing.
Therefore they are a perfect alternative to use on a smartcard.
The card does not support DSA keys. Even if you are using a RSA key you might encounter problems. The cards available at the moment only support 1024 bit keys.
The suggestion is to use the key on the card only for signing and decrypting but NOT for key signing.
Note
By keeping the primary key offline it is not exposed to remote attacks. gpg has offered this feature for many years. Werner in fact has been using this method for his 5B0358A2 key since 1999. Using this method was not easy at first since some OpenPGP implementations and the keyservers were not able to cope with signing subkeys. Times have changed and signing subkeys is state of the art today.
Warning
Secret keys stored on a computer accessible via network can be compromised.
Initialise your card but do not call generate - call quit. Start gpg calling --edit-key <your_keyid>. Now enter addcardkey and make your decision to either create a signature, an encryption or an authentication key.
archi@foobar:~ > gpg --edit-key FF19F200
gpg (GnuPG) 1.4.0; Copyright (C) 2004 Free Software Foundation, Inc.
This program comes with ABSOLUTELY NO WARRANTY.
This is free software, and you are welcome to redistribute it
under certain conditions. See the file COPYING for details.

Secret key is available.

pub  1024R/FF19F200  created: 2005-03-05  expires: never       usage: CS
                     trust: ultimate      validity: ultimate
sub  1024R/F09033F1  created: 2005-03-05  expires: never       usage: E
sub  1024R/3239D981  created: 2005-03-05  expires: never       usage: A
[ultimate] (1). Archibald Goodwin (The Tester) <archi@foobar.example>

Command> addcardkey
Signature key ....: 884B 9142 F645 1A72 4B92  EB94 DF80 CCEF FF19 F200
Encryption key....: 31C1 2190 FCF1 A684 5AF9  D719 26D7 28A8 F090 33F1
Authentication key: 811F C45F 911A C15A F6DC  5BD6 58BA B8D1 3239 D981

Please select the type of key to generate:
   (1) Signature key
   (2) Encryption key
   (3) Authentication key
Your selection? 2

gpg: WARNING: such a key has already been stored on the card!

Replace existing key? (y/N) y
gpg: 3 Admin PIN attempts remaining before card is permanently locked

Admin PIN

PIN
Key is protected.
Please specify how long the key should be valid.
         0 = key does not expire
         <n>  = key expires in n days
         <n>w = key expires in n weeks
         <n>m = key expires in n months
         <n>y = key expires in n years
Key is valid for? (0) 0
Key does not expire at all
Is this correct? (y/N) y
Really create? (y/N) y
gpg: existing key will be replaced
gpg: please wait while key is being generated ...
gpg: key generation completed (27 seconds)
gpg: signatures created so far: 6
gpg: signatures created so far: 6


pub  1024R/FF19F200  created: 2005-03-05  expires: never       usage: CS
                     trust: ultimate      validity: ultimate
sub  1024R/F09033F1  created: 2005-03-05  expires: never       usage: E
sub  1024R/3239D981  created: 2005-03-05  expires: never       usage: A
sub  1024R/F6518D6B  created: 2005-03-05  expires: never       usage: E
[ultimate] (1). Archibald Goodwin (The Tester) <archi@foobar.example>
First create a signing key. If this kind of key already exists on the card, a security question has to be answered. Run save to commit the changes to the card. The key on the card will not be removed if you do not save the changes. You can create another subkey by again calling addcardkey. Choose the encryption key and proceed as explained.
Note
gpg will always use the latest created key of a given type.
There is no direct way to create a backup key of the card's decryption key like it is done with the generate command.
Note
Make a copy of your secret key before running the following commands. Otherwise the whole procedure will be pointless.
A few steps more will help you to achieve this goal. First create a regular RSA subkey of 1024 bit length using the addkey command. Then select this new key and run keytocard. gpg transfers the key to the card and replaces the existing secret key with a stub.
Table of Contents
- A.1.1. If I'm correctly informed GnuPG and smartcards use 1024 Bit RSA. Some say the security level of RSA-1024 is comparable too about 80 Bit symmetric key and cannot be regarded as highly secure.
- A.1.2. Where do I get a reader?
- A.1.3. How do I use the cryptocard on MacOSX?
- A.1.4. I am having problems, where do I get further help?
| A.1.1. | If I'm correctly informed GnuPG and smartcards use 1024 Bit RSA. Some say the security level of RSA-1024 is comparable too about 80 Bit symmetric key and cannot be regarded as highly secure. |
The quality and security of the implementation and the entire environment and not the length of the key protect the secret key against a compromise by any non-physical attack. 2048 bit RSA is possible but at the moment far too expensive. The specification allows for 2048 Bit RSA cards. Feel free to build one. | |
| A.1.2. | Where do I get a reader? |
Currently we know that you may order card
readers from FLOSS-Shop. The
website is only in German, but you can order the
"USB Chip-Karten Lesegeraet SCM SCR-335" for 29,00
EUR from all over Europe; either by prepayment via
bank transfer or paypal. You have to sent your
orders via email to
In the UK, SCM card readers can be purchased online from http://www.crownhill.co.uk/. | |
| A.1.3. | How do I use the cryptocard on MacOSX? |
There is a description on http://www.py-soft.co.uk/~benjamin/download/mac-gpg/. | |
| A.1.4. | I am having problems, where do I get further help? |
If you need further help, please take a look at the GnuPG mailing lists. |
- CHV
Card Holder Verification, commonly followed by a number denoting which CHV is meant. The OpenPGP card uses three CHVs: CHV1, CHV2, CHV3. They are often also referenced as PIN 1, PIN2, PIN 3. CHV3 is used as the so called Admin PIN (which is sometimes also called S(ecurity)O(fficer) PIN).
- PC/SC
Personal computer/Smart Card. The standard framework for Smart Card access on Windows Platforms (included in Windows2000). There are also implementations for GNU/Linux and other Free OSes (i.e. pcsclite).
- CCID
Chip Card Interface Description. The specification for the USB device class used for chip card readers is 11 (0x0B).
- OpenPGP
OpenPGP is a non-proprietary protocol for encrypting email using public key cryptography. It is based on PGP as originally developed by Phil Zimmermann. The OpenPGP protocol defines standard formats for encrypted messages, signatures, and certificates for exchanging public keys.